Look anywhere on the web and you will be told you need an audio interface to connect your mic to your MacBook, or you need to switch to a USB mic. Well, it ain’t necessarily so.
The 3.5mm socket which is still on MacBooks is perfectly capable of taking your mic and providing high quality results.
Here are two methods, both of which I use.

With both methods I use a TRRS splitter (around £5). This plugs into the Macs 3.5mm socket and separates out the Mic and the headphone connections.
The simplest way – one mic.
My mics like almost all dynamic mics have a XLR connectors. So all I needed to do was to get the Mic connected to the mic socket in the above TRRS splitter.
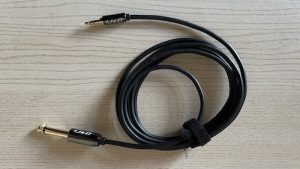
I have made a custom cable to do the job, but the following method just uses easily available adaptors.
My goto mixer is my modified MX400 described in this page. This needs 1/4″ jack connectors so I use XLR to jack connectors.
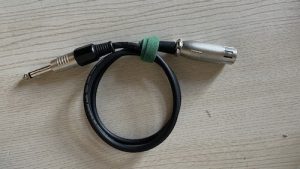
The TRRS spiltter needs a TRS input so I use a TRS to jack connector.
And to join them together a jack to jack converter is needed.
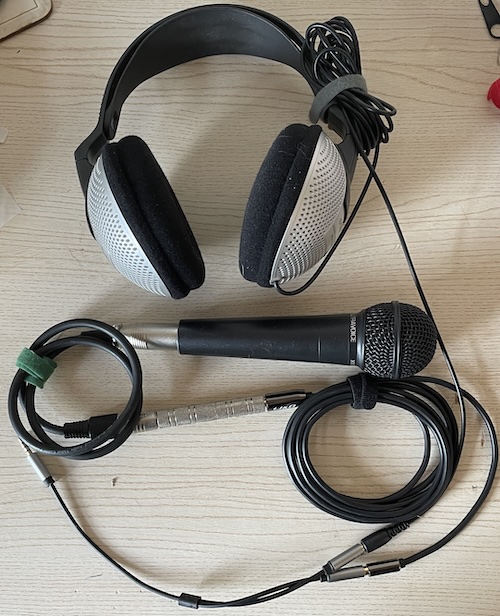
So the whole set up including the headphones, which I use to listen to the masterpiece I have just recorded, look like this.
Now, once again getting back to what you might read on the web:-
- The signal from the mic will be too low to use.
I use this for singing and playing. With the mic around 12″ away from me and the guitar, and the input volume at max, I get a signal just below (2.5dB) the peaking signal on the MacBook. If I am closer I can turn the input volume down. - The signal will be too noisy.
With the mic replaced by an equivalent resistor I get a noise floor of -65dB. I can’t hear it. Perhaps someone with exceptional hearing sitting in a silent environment may hear it. I don’t think many of my listeners will fit into that category.
Caveat.
Apple and probably all other devices with a 3.5mm headset jack put a 2.5V dc voltage on a microphone line. This is used to power an electret mic. MacBooks and iPhones also needs to see a dc load on the line before it will allow the external mic to be selected. This means that the simple solution above puts a dc voltage on the mic. I have used the mic like this quite a lot and never had a problem, but Shure in this article do not recommend it.
A dynamic microphone should not be connected to an input that supplies bias voltage (such as a wireless transmitter) because the audio and the bias voltage will travel down the same conductor. If this occurs, the frequency response of the microphone may be altered or the audio signal distorted. If a dynamic microphone must to be connected to an input with bias voltage, a blocking capacitor must be used. The blocking capacitor is placed in series with the hot conductor of the microphone.
I have never noticed any change in frequency response or distortion. But I have modified one of my mics out of interest,
Now simply adding a blocking capacitor would stop the MacBook or iPhone recognising the mic, so an additional resistor is needed. I find a 5.6K resistor works with the MacBook and the iphone.
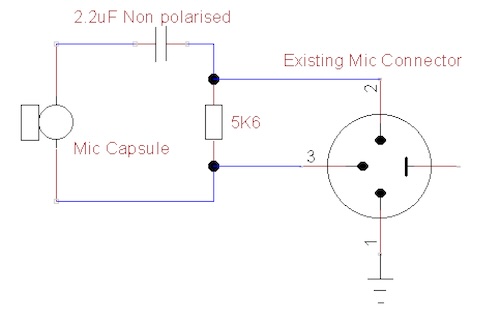
In this way the Mic capsule sees no dc and the headset socket sees a 5.6K resistor. I installed mine inside my Mic, a behringer XM8500. It does not affect the normal operation of the microphone and allows it to be connected to a preamp or a headset socket.
I put the components in the wires between the capsule and the XLR connector. It would have been easier to install the components on the back of the XLR connector, but Behringer seem to have glued it in.
I honestly don’t think it is needed, but it does no harm.
The (very slightly) more complicated way – using multiple mics.
All of the connectors and adaptors above can be replaced by a home made cable going straight from the mic XLR to a TRS plug, or even straight into the Mackbook on a TRRS plug and I have done that, and it works.
But having the headphone socket is nice and also this guy which can be taken out and replaced with this chappy.
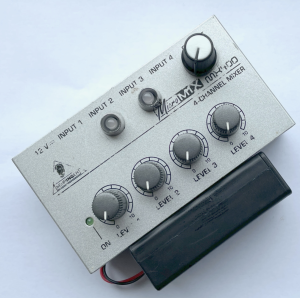
I can combine up to four sources, either mics or pickups.
I usually don’t use instrument pickups, preferring the sound through the mics, but it’s an option.
The mics do not need any modification, as above, but modified mics work as usual.
Works for me!